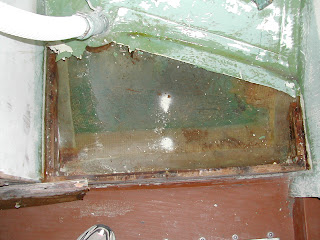
BIG milestone this week - the chainplates for the uppers finally went in. It's been a long time coming...it's been nearly a year since I started ripping out the cabinetry in the head to replace all the chainplates, and now it's complete. Nevermind sports new and stronger chainplates for the aft lowers, uppers, and the backstay. The forward lowers are going to wait till later, since they are 1) still in OK shape, 2) easily accessible anytime from the v-berth, and 3) not heavily stressed on a Triton fractional rig.
It felt great to bolt in those new chainplates. There are only a few small details left to wrap up, like installing chainplate covers, painting the primed areas around the uppers, and opening an area for a nut on the back of the #4 bolts on the uppers (there are 5 3/8" SS bolts for each chainplate).
I was also able to put the final coats of paint on the head areas and the port settee (shown). For the settee I'm using Benjamin Moore Super Spec semi-gloss alkyd enamel, color-matched to my new formica. It's really good paint, as it levels nicely and covers very well.
Monday, November 19, 2007
Monday, November 12, 2007
Fires from CIH
Saturday, November 10, 2007
Painting the head, and wrapping up the chainplates
First thing today was to test-fit the new covers, which fit great and looked super! I'm going to take the winch covers back to stitch an elastic grip around the inside perimeter so they don't fly off the winches in heavy wind.
I faired around the upper chainplate slots. Fairing and painting are all that's left before I can bolt in those chainplates for good and call this epic project DONE. Replacing chainplates is a big job - well, it was this time, because in every case I wanted to upgrade the marginal original installation with something beefier and easier to service.
After some final fairing, and sanding in the head, I gave everything an acetone wipe-down and then rolled on a coat of white Bilge-Kote. You can't imagine how great it feels to finally hide all that ugly bare fiberglass, plywood, old paint and general filth. Now I can see how the new head/hanging locker will look. The bare portions of the bulkheads are where I'll place white satin Formica - the paint will mostly be hidden by cabinetry but the Formica will be exposed.
Friday, November 09, 2007
Canvas work - winch covers, grill cover
Thursday, November 01, 2007
Painting lockers
November 1st, I arrived back at the boat at Channel Islands Harbor direct from Grand Staircase/Escalante in Utah. Nevermind was waiting for me at the end of my month-long sojourn, and I plunged back in to work with renewed vigor. There's beginning to be more visible payoff with every step I complete, so that Nevermind is always looking better and better. This is gratifying.
Having previously patched and filled a few holes in the port settee lockers, the two deep bins were now ready for paint. I mixed up a strong TSP solution and scrubbed them well with a Scotch-Brite pad, and then rinsed...and rinsed....and rinsed, till the TSP was all gone. After drying, I scuffed the paint with 80 grit sandpaper, vacuumed out the dust, and laid in a coat of white Bilge-Kote. The next day I followed up with a second coat. The transformation was dramatic!
I also removed and serviced the house battery (installed 8/05) today - electrolyte was a little low in 2 or 3 cells.
I finished by taking many pictures of the boom before removing it - it's going home for a cleaning, straightening (it has a minor bend after an incident with a preventer), and painting. How about that arrangement at the end of the boom - nice, huh? When I got the boat there was no end cap at all and the topping lift didn't work at all. This was a quick & dirty rig to get us down from San Francisco.
One more thing - the (presumably polyester Bondo) fairing filler on the seahood is failing. It's not adhering to the glass. When the filler comes off, the paintdoes too, leaving bare glass. That will have to be stripped, re-faired, and repainted. The sea hood is also not bolted down, so I'm going to sink some 1/4-20 SS bolts through the flange to fix it more securely to the cabin top. Right now only bedding compound holds it on the boat.
Sunday, August 26, 2007
Painting the cockpit
Finally, a project that's not only functional but is also cosmetic! It's so much easier to stay motivated when you can see progress and when the boat looks a little better every week.
We vacuumed out the cockpit and then used a brass brush and acetone to remove so old tar or gummy bedding compound that was stuck in the nonskid pattern . We followed that up with a wash using a stiff brush and a strong TSP solution.
Then we taped off the nonskid area in the cockpit sole. Here I keep myself off the newly cleaned sole while trimming the masking around the aft corners.
Finally we were ready to roll on the paint! We used Interlux Interdeck in beige.
I was thrilled with the way the first coat came out...all the old worn-out gel coat was covered and it looked great! One more coat and it's done.
Great strides.
In contrast with my discouragement of a few weeks ago, this week seemed like great progress was made. Inspired by meeting one of the circumnavigators of Sohcahtoa, I plunged in to the current projects with a renewed vigor. Plus, this week I again had some help from Michele. This means (perhaps unfortunately) that you get pictures of me in action...
The first item was to set up Karl's boat, Passat, with the winch covers I made. Karl was missing this weekend, though...so I gave ém a shot of 303 and put them on the boat for him to find.
The area aroung the backstay chainplate was ready for paint, so I sanded the primer once more with 120 and then brushed out some Brightside. I also rolled some Bilgekote on the chainplate knee structure inside the lazarette, but didn't take any pictures!
Next up was continuing the reinforcement of the main bulkhead around the upper chainplate mount. I cut several pre-measured lengths of West 4"biax tape. This stuff is a joy to work with, because it's so easy to do neat work. After a thin coat of raw epoxy thickened with West microfiber filler, fo fill the weave of the unlerlying laminate, we layed on the additional glass. We taped across the bulkhead/hull seam, not along it, as I wanted to bond to the raw fiberglass and bare wood beyond the existing tabbing.
Later I took a little wrecker bar and quickly removed the old, nasty head platform. It was barely attached; most of the bond was in the many layers of old paint! The tabbing was weakly bonded and pulled loose easily. Everything was in good shape underneath.
Monday, August 20, 2007
Summertime progress
Progress is good these days. Last weekend (the 19th) I went down for a work day.
First item was to sand, prep, and prime the repaired areas around the backstay chainplate and the old flagpole base. I put one a coat of Pre-Kote in the morning and was able to sand and re-coat by late afternoon.
I also test-fitted the mooring bitt and its 1/4" pre-fab fiberglass base. The plan is to epoxy the base to the poop deck and then through-bolt the bitt through base and deck. I'm somewhat tempted to put the bitt off-center and out of the way somewhere, for two reasons: one, so that there is a nice place to sit on the poop deck, and two, so that it doesn't straddle the chainplate knee below. The center seems best for appearance, but since the stern roller won't be centered either (the backstay dominates the center) perhaps it's best to offset the bitt to the starboard side near the deck pipe. That's a decision to make.
My friend Michele finished up the leather chafe covers for the chain-to-rode splices on both the bow and stern rodes.
I did some fairing on and around the main bulkhead, and then reinforced the chainplate mounting area on both sides with two layers of 24 oz. woven roving. I'll also add tabbing strips of 4" West biax tape along the bulkhead. This is the most stressed area, with the primary (upper) shrouds and their tension load attaching to these chainplates. The mast compression load (which I've calculated will max out at about 4000 lbf in an extreme load) comes in about 3 feet away on the main beam.
Monday, July 16, 2007
Grunt Work
I have to admit to some moments of discouragement this last weekend. The work was so hard, and the visible (or at least entropy-decreasing) changes so few, that I wondered if I'd ever wrap up the chainplate replacement. On Saturday I concentrated on the upper chainplates, which meant grinding the old paint away from the main bulkhead where the upper chainplates bolt. It's pointless to set up for grinding but only do a small area, so I ground the entire head & hanging locker area - main bulkhead, aft bulkhead, hull, and deck bottom. I used 40 grit but whatever the original paint was, it's incredibly tough. And it makes mountains of dust. A larger Shop-Vac finally made the vacuum attachment to the PC grinder more effective and kept the dust down somewhat, but not before the whole boat was covered in white dust - again. I took things down to the glass around the chainplate areas because they will need some mild fiberglass repair, reinforcement, and fairing before the new plates go in. There are gaps in the tabbing below the plates which I want to bridge as well.
Other progress: I also managed to chisel out all of the awful old polyester resin 'mush' in which the cabin liner had been bedded. I freed the backstay chainplate from its custom-cast bed on the chainplate knee and prepared it for mounting soon. The hawsepipe for the stern rode was mounted on the poop deck in an ample bed of polysulphide, and it dresses things up considerably there. And finally, I got the rope-to-chain splice done on the bow anchor rode. It came out nicely.
Wednesday, June 20, 2007
Upper chainplate replacement begins
Now it's the uppers chainplates' turn for replacement. These plates anchor the critical upper shrouds which run to the top of the mast. These are the most heavily loaded shrouds on the Triton (and most sailboats) and they need a bulletproof anchor.
To start, I lashed a wooden beam to the forward and aft lower chainplates, detached the uppers, and then lashed the uppers to the middle of the beams. The shrouds aren't tight but these beams will provide enough temporary support during the work.
I knocked the old chainplates out through the deck with a hammer. Compare the original 1"x 1/8" three-bolts chainplates with the new 1" x 1/4" 316L SS plates with 5 bolt holes. These new plates are also electropolished for corrosion resistance. I did all the engineering calculations for rigging loads and then for chainplate cross section and am confident that these are robustly sized. They have tensile & yield strengths comparable to the other parts of the rig. If I get ambitious I'll post my rigging loads spreadsheet here one day. If you want to do these yourself, get a copy of Henderson's rigging book for the rig loads and any solid mechanics textbook for the tensile, bearing strength, and shear strength calculations.
This is the starboard chainplate location. I'll fill the old holes with epoxy and layup a few layers of fiberglass over the beds for reinforcement. The new chainplates will extend much farher down the main bulkhead than did the old ones.
Chainplate project progess..
A couple of weekends ago I worked more on the chainplate project. The first photo shows the port aft lower complete. I replaced the solid forks and single toggle of the old Merriman turnbuckles with two Hayn toggled forks. This fit perfectly on both sides and is a simpler system.
The backstay chainplate is coming along. I managed to create a bed of thickened epoxy for the chainplate. I covered the chainplate with electrical tape and waxed it liberally to ensure good release from the epoxy.
Finally, I dug out some rotten core around the old vent cutout in the poop deck. The area of deteriorated core wasn't large - at inch beyond the cutout at most - and was easy to fill with thickened epoxy. Soon I'll redrill mounting holes, bed the hawsepipe, and through-bolt it to the poop deck.
Subscribe to:
Posts (Atom)