Sunday, December 10, 2006

More chainplate knee work, lead paint?

December 3rd, last Saturday...
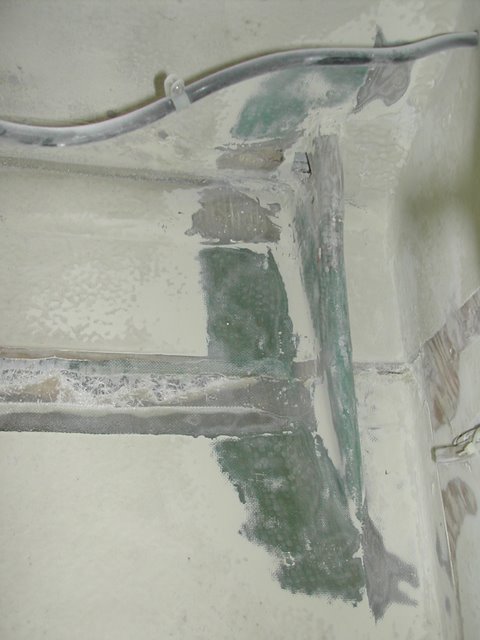
With the trusty Porter-Cable DA sander and a collection of 40 and 80 grit disks, I attacked the tough old paint around the aft chainplate knees. I don't know what Pearson used but it is tenaciously adhered and it doesn't appreciate being sanded off. In fact, the sanded paint gets even with its aggressor by creating masses of incredible dust which settle everywhere on the boat - this despite heroic ventilation attempts.

Progress was discouraging. The paint was tough and access to the chainplate knees was not good. Neither my DA or the orbital palm sander will reach the nooks and corners around the knees.


Posted by Picasa

It was sometime that evening, after arriving home from the boat, that it occurred to me that the old paint I was grinding might be lead paint. I posted on the Plastic Classic forum to see if anyone else had run into the lead paint problem on their Triton. Eventually I called a local company (Channel Coast Corporation) which specializes in lead paint remediation and the like. They suggested I take samples to be sent in for lab testing, which I did - taking one chip sample from the hull paint in the head compartment, and another from the paint atop the port settee.

The first sample came back completely negative, and the second came back with .23% lead by weight - yes, 23 hundreths of a percent. Evidently the legal definition of lead paint around here is > .5% ... so, it's not lead paint, at least legally! The risk seems small at this point if I simple and prudent measures like P100 respirators and proper cleanup.

Tuesday, November 21, 2006

Wednesday, November 15, 2006

Chainplate replacement and head redo, continued.

Last weekend I jumped back into the boat projects in earnest. Saturday saw me up the mast to loosen the jumpers a bit and look things over. I rigged the halyards securely to the bow cleats, put on my frog system, and went up. I discovered a broken strand in the starboard upper, which means that there are broken strands in both upper shrouds. Time to replace them!

I loosened the jumpers and came down. After removing the cotter rings from each turnbuckle, I loosened the rest of the rig and then tried moving the mast head back (it had been leaning slightly forward). The backstay bottomed out before I got the mast truly vertical. The backstay needs shortening by about an inch. The headstay I don't know about. Last winter when we replaced the headstay we attached it to the most substantial tang. That happened to the the topmost. We hung the jib & spinnaker halyards off the two lower tangs, which is fine except that the spinnaker halyard needs to be above the headstay. When I unstep the mast I'll need to replace the middle tang with a substantial one ready to accept the headstay.

Having gotten the rig good and loose I decided it was time to remove the chainplates for the aft lowers. I went below, chiseled some paint off the nuts, and then unbolted them. The bolts were common galvanized carriage bolts, heavily rusted, but they came out easily with a couple of taps from a hammer. Then, on deck, I pulled out the chainplates with a pair of pliers.

Both chainplates were homemade of 1"x1/8" SS and were about 7" long. Both of them had been bent into a S curve in order to fit through the chainplate slots. The slots did not line up with the knees. I cleaned out the polysulfide from the slots and taped over them to prevent water from entering.

As soon as I arrived Sunday I mixed up some TSP and water and started scrubbing down the head and hanging locker where I had torn out the cabinetry before. The scrubbing was needed before I could grind paint; if there's any oil or wax in the paint, sanding and grinding can spread it around. Potentially this could cause paint or epoxy adhesion to be poor. So I scrubbed.

After five or six rinses with fresh water the paint was ready. I was about the start some grinding when instead I decided to grab the Dremel and have a go at the inner liner. I sliced into it with the normal ceramic cutting wheel and it went through the thin liner like butter. The liner looked like a chopper gun construction and it could be torn by hand in places. The liner was much thicker and more substantial, though, where it met the hull. Also, great gobs and fillets of polyester resin mush had been emplaced on the underside of the decks before the liner was installed. I tore the liner loose and tried to chisel off most of the hardened mush.

By the end of the day I had the inner liner completely removed from the head/hanging locker area and most of the mush chiseled away from the port side. I ground some of the old paint off the port side knee before cleaning up the dust and refuse I had created and calling it a day.


Posted by Picasa

Wednesday, October 25, 2006

Here's the new tender, a Folbot Yukon folding kayak. I haven't named her yet. Something having to do with donkeys would be good, like "Sea Donkey" or "Burro del Mar" or "Burro Flotante" or "Meeresel".

Start with a couple of bags....
The frame takes shape...
The result! Posted by Picasa
  Posted by Picasa

test post from email

This works too!

Chainplates and tiller

Today I called H&L down in LA and got them to fax me the ordering guide for new tillers. I need to decide the shape and length and call them back. I'll do some rough templating this week or weekend.

I also ordered some chainplate material from Onlinemetals.com. I chose 316L stainless in a 1" width and and .25" thickness. 316L has a yield (NOT tensile) strength of about 200 MPa and I worked out that a 1" x 1/8" plate would yield at about 1800 kgf. This would be roughly halved at the pin hole for only 900 kgf. I decided this wasn't good enough since the 3/16" wire is good for 3600 lbf or about 1800 kgf.. I still need to compute the bearing stress and tear-out shear stress before fabricating the plates, and calculate the final yield and tensile strength. Also, while drilling the SS shouldn't be a big deal, I don't have the best tools for cutting and polishing. I did a quick design on eMachineShop.com but the price quotes were a little high and the delivery times were nuts: 20-40 working days.

I need to start managing this project better. Time to get more organized and try to proceed in parallel.

Sunday, October 22, 2006

Crowbar frenzy!

The first job on the list was supposed to be a small one: replacing
the pencil zinc in the engine heat exchanger. The old zinc had corroded
itself to the gallery and I had to clean out the threaded boss with a
small screwdriver before the new zinc would go in. Of course the threaded
boss is on the bottom of the heat exchanger at the back of the engine...a
very hard-to-reach spot. Next I topped off coolant level. The leak
seems to be coming from the drain petcock on the heat exchanger, which
is right next to the mounting boss for the zinc. The heat exchanger
probably needs some attention. After completing these small jobs I
started the engine and checked the alternator for output, and yes,
it's working fine. This means that the starting battery must truly be
on it last legs (there was some question about whether it was dead or
just not being charged). Time to replace the starting battery. What
is in there now: a Group 24M, 500 CCA. No amp-hour rating (says 95 RC
minutes. I think RC is measured at a 25 AH rate which would mean this
is about 40 AH at 25 A rate.) I took a short cruise to check the heat
exchanger for leaks and to get the boat out! When the engine started,
some zinc paste came out with the first burst of exhaust water. With
luck most of the remnants of the old, neglected zinc got flushed out.
Next I moved on to the head and rig projects by removing the old cabinet
facing in the head compartment. After more demolition I'll get good
access to the chainplate knees for reinforcement and replacement. Had
to knockoff early Saturday to make a dinner in Santa Barbara.

Early Sunday morning I was back at the boat with tools in hand. I wasted
no time in demolishing the head (port side) cabinetry. There were a
couple of shelves that were cleated to the bulkheads and lightly tabbed
to the hull. I detabbed the wood with a chisel, unscrewed the cleats,
and pried the shelves out. In the afternoon I did the same with the
hanging locker. Both compartments are now stripped and the chainplate
knees are accessible.

Sunday, October 15, 2006

Off-season kickoff & the new tender

This weekend I promised myself to get started with several of the major projects that I had planned for the boat. Over the summer, as we'd taken trips to the islands, some of the really pressing problems made themselves clear. For one, Nevermind's ground tackle isn't great. With a 22 lb generic plow at the bow and a cheesy 20 lb Danforth at the stern, we aren't going to ride out the perfect storm at anchor. Furthermore, the chain portion of the rodes was in marginal shape and the rodes themselves weren't long enough.

Another major problem - it's hard to cook well on Nevermind. There's no fixed stove. In fact, there's no stove beyond the sea swing, on which you're lucky to boil water. Poaching an egg would be an incredible feat. Also, stowing all the pots, pans and other cookware is a problem: there is plenty of space in the galley lockers, but poor access and no subdivision.

Yet another tricky matter: the head just wasn't right. Nevermind was built in 1963 when direct overboard discharge was the norm. That's fine but not legal today and also not compatible with exploring in the Channel Islands. Besides, the head itself was an ancient Raritan PH1, probably original equipment to the boat, and somewhat leaky.

There are questions about the rig. It's in decent shape overall, but the chainplates are doubtful. The port shroud has a newly broken strand. Corrosion is widespread on the boom, and the dodger interferes with the boom's swing.

Nevermind needs a tender or tenders. The old one lies on the ocean floor near Point Conception, yet another victim of that infamous cape.

Finally, the engine needs some attention. It doesn't have major problems that I know of, but it's time for it to get a thorough renewal. All belts and hoses need replacement, the valves need adjustment, the motor mounts are shot, and it's out of alignment. The starting battery is shot. The primary fuel filter is better suited to gas than diesel and takes up too much space. There's no strainer on the raw water intake line, and the raw water pump impeller needs replacement.

This weekend was a chance to get started - to jump in with both feet. The boat was covered in ash from the Day Fire, so I spent the first few hours Saturday cleaning the decks. I also opened up all the cockpit lockers, cleaned everything out of there, and scrubbed them down. The dock box got cleaned out and organized. I replaced the lost bow hawsepipe cover with a new one from my spares box, but it still needs a retaining line of some sort to keep this one from being kicked over. I took care of a few small things, like removing and measuring the tiller for replacement (I plan to have H&L fabricate a new one), getting a new shore power cord and reel, and cleaning out the bilge. But the proudest accomplishment was the removal and disposal of the ancient Raritan head. It's gone.

In between all this work, I managed to test out the new tender: my new Folbot Yukon folding kayak. One thing's for sure: there's not much else that tops the coolness factor of showing up with a couple of bags and 15 minutes later paddling off in a sleek kayak you put together from the parts in those bags.