Monday, July 16, 2007

Grunt Work

I have to admit to some moments of discouragement this last weekend. The work was so hard, and the visible (or at least entropy-decreasing) changes so few, that I wondered if I'd ever wrap up the chainplate replacement. On Saturday I concentrated on the upper chainplates, which meant grinding the old paint away from the main bulkhead where the upper chainplates bolt. It's pointless to set up for grinding but only do a small area, so I ground the entire head & hanging locker area - main bulkhead, aft bulkhead, hull, and deck bottom. I used 40 grit but whatever the original paint was, it's incredibly tough. And it makes mountains of dust. A larger Shop-Vac finally made the vacuum attachment to the PC grinder more effective and kept the dust down somewhat, but not before the whole boat was covered in white dust - again. I took things down to the glass around the chainplate areas because they will need some mild fiberglass repair, reinforcement, and fairing before the new plates go in. There are gaps in the tabbing below the plates which I want to bridge as well.

Other progress: I also managed to chisel out all of the awful old polyester resin 'mush' in which the cabin liner had been bedded. I freed the backstay chainplate from its custom-cast bed on the chainplate knee and prepared it for mounting soon. The hawsepipe for the stern rode was mounted on the poop deck in an ample bed of polysulphide, and it dresses things up considerably there. And finally, I got the rope-to-chain splice done on the bow anchor rode. It came out nicely.


Posted by Picasa

Wednesday, June 20, 2007

Upper chainplate replacement begins

Now it's the uppers chainplates' turn for replacement. These plates anchor the critical upper shrouds which run to the top of the mast. These are the most heavily loaded shrouds on the Triton (and most sailboats) and they need a bulletproof anchor.
To start, I lashed a wooden beam to the forward and aft lower chainplates, detached the uppers, and then lashed the uppers to the middle of the beams. The shrouds aren't tight but these beams will provide enough temporary support during the work.


I knocked the old chainplates out through the deck with a hammer. Compare the original 1"x 1/8" three-bolts chainplates with the new 1" x 1/4" 316L SS plates with 5 bolt holes. These new plates are also electropolished for corrosion resistance. I did all the engineering calculations for rigging loads and then for chainplate cross section and am confident that these are robustly sized. They have tensile & yield strengths comparable to the other parts of the rig. If I get ambitious I'll post my rigging loads spreadsheet here one day. If you want to do these yourself, get a copy of Henderson's rigging book for the rig loads and any solid mechanics textbook for the tensile, bearing strength, and shear strength calculations.

This is the starboard chainplate location. I'll fill the old holes with epoxy and layup a few layers of fiberglass over the beds for reinforcement. The new chainplates will extend much farher down the main bulkhead than did the old ones.
Posted by Picasa

Chainplate project progess..

A couple of weekends ago I worked more on the chainplate project. The first photo shows the port aft lower complete. I replaced the solid forks and single toggle of the old Merriman turnbuckles with two Hayn toggled forks. This fit perfectly on both sides and is a simpler system.
The backstay chainplate is coming along. I managed to create a bed of thickened epoxy for the chainplate. I covered the chainplate with electrical tape and waxed it liberally to ensure good release from the epoxy.

Finally, I dug out some rotten core around the old vent cutout in the poop deck. The area of deteriorated core wasn't large - at inch beyond the cutout at most - and was easy to fill with thickened epoxy. Soon I'll redrill mounting holes, bed the hawsepipe, and through-bolt it to the poop deck.
Posted by Picasa
That ugly bucket had been sitting on the poop deck for several weeks. The chain for the stern anchor was sitting in it. To get the chain below decks, I decided it was time to install the new hawsepipe. To do that, I had to remove the old vent from the deck...


Posted by Picasa

Aft lowers finished.


On June 10th I finally got some pictures of the new aft lower chainplates. The machine shop finished all the new chainplates in late May, and I took them to the electropolishing shop afterwards. They came out looking fantastic.

The port side. Each chainplate is bolted in with 4 3/8" bolts spaces abot 1 5/8" apart. The chainplates themselves are 316L stainless, 1/4" thick and 1" wide.
Starboard aft lower...

Today I worked on the backstay knee, first sanding it and then expanding the deck slot to accommodate the new 1 3/4" by 1/4" chainplate. I test fit the chainplate but left bedding for later.

Monday, May 28, 2007

Aft lower chainplates are in!

Today the aft lower chainplates finally went in. Unfortunately, the camera didn't make it to the boat with me today, so no pictures. After electropolishing the new chainplates looked fantastic and installing the first pair was a simple matter of masking off, applying some polysulfide, and then bolting them in place. Nice!

I also put a coat of varnish on the GPS bracket base.

Also, I wrapped up the major glass work on the backstay chainplate knee. After 2 more layers of 24 oz. roving on the sides, several pieces of 6" 10 oz. tape over the fillets, and several lengths of 2" 10 oz. tape over the front of the knee...it's done! On my next work day I'll sand it smooth and begin locating the chainplate itself. I'll probably fair a few spots before paint.

Stay tuned for pics...

Wednesday, April 18, 2007

Chainplate update

The chainplates are out at the machine shop for fabrication, and I'm gradually wrapping up the knee replacement. The backstay knee is still the big focus.The first day of glassing I applied 2" tape to all four fillets, followed by a layer of 24 oz. to the sides of the knee. After time to gel, I cut four strips of the excellent West 4" biax tape and glassed these in over the fillets. These strips were followed by four more offset 1" to the outside.


The following week I was back. After washing and sanding the previous glasswork,I cut glass for more offset strips of biax tape, as well as more 24 oz. roving for the knee sides. I glassed these in and also ran strips of 2" tape down the front edge of the knee. Yes, I missed a wrinkle or two along the edge! With luck these will sand out ok. Otherwise everything turned out well.

Posted by Picasa

Monday, April 09, 2007

Heavy glass work on the backstay knee

I spent last Saturday (4/7) working on the boat, mostly concentrating on the backstay chainplate knee. Forgot the camera, so word will have to suffice. After a thorough sanding of the fillets around the backstay knee, I laid in strips of 2" tape along the top and bottom. Next came large pieces of 24 oz roving to cover the sides of the knee, followed by strips of 4" West 15 oz biax tape along the fillets. The biax tape is great to work with: tough to wet out, but very easy to laminate as it holds its shape and doesn't unravel.

I stripped the mainsail off the boom and took a few more measurements of the gooseneck, boom length, and other rig dimensions. The aft lower knees got their final coat of paint, and I cleaned up the awful dust. The recent rebuilding of the seawall near the slip has left a lot of bare ground nearby.

I promise more pictures soon!

Wednesday, February 28, 2007

Knee replacement surgery

The new backstay chainplate knee is going in - after a big degreasing and sanding effort in the laz I spent a lot of time fitting the core before filleting it in. Next comes tape: 2", 4" biax, offset 4" biax, 6" cloth, 12" cloth. The core is 1/2" Baltic Birch ply - it's a high quality Russian ply with 7 laminations in the 1/2" thickness. It's also void-free - at least so far I haven't found any voids.
Posted by Picasa
I filled the holes in the transom here the backstay chainplate carriage bolts used to be. I'll touch these up with white paint later. Wow, that rubrail looks awful - it took a beating coming around Point Conception and has been a little flaccid ever since.
Posted by Picasa

Setting up the ground tackle

I measured out and cut the 1/2" three strand line for the anchor rode: 150' for the bower and 250' for the stern. It helps that the dock slabs are 8 ft each.
Posted by Picasa

Stern anchor mount

Picasa and Blogger seem to be hating the guts of each other and pictures aren't showing up in Blogger. I'm testing things out and thought I'd try to show a picture of the new stern anchor arrangement - that's a 22 lb standard Danforth in a Windline bracket - the rode will go under the rail to the deckpipe so deploying this anchor should take only a matter of seconds: untie the rail lashing, lift out of the bracket, and drop. It's important that this be convenient because this anchor can serve as an emergency brake if the engine fails at an inopportune moment, etc.
Posted by Picasa

Wednesday, February 21, 2007

Last weekend - backstay work


First I started fairing out the starboard aft lower...

Tuesday, February 20, 2007

Sunday, February 11, 2007

I wasn't at the boat long today and didn't do much, but I did grind out the starboard chainplate repair enough to put in 3 layers of 10 oz cloth.

I also sanded and primed the faired repair to the port chainplate area.

One more thing - I measured the mast today. This was a major disappointment because I found out my mast is a non-standard height and is shorter than it should be. A Triton fractional rig is supposed to have a 36' mast. Mine is 33' 10" to the top, or 33' 2" to the sheave. Since the gooseneck is 2'7" off the deck, my main luff can only be about 30' 9" and it is supposed to be 33'. I'm still debating what to do because if I stick with this mast, new sails will have to be custom-made to it and I will be locked into this weird rig.

BTW, the gooseneck (actually, the tack) is supposed to be 2'9" off the deck, so the boom is low. I thought it must be. Posted by Picasa


 Posted by Picasa

More...


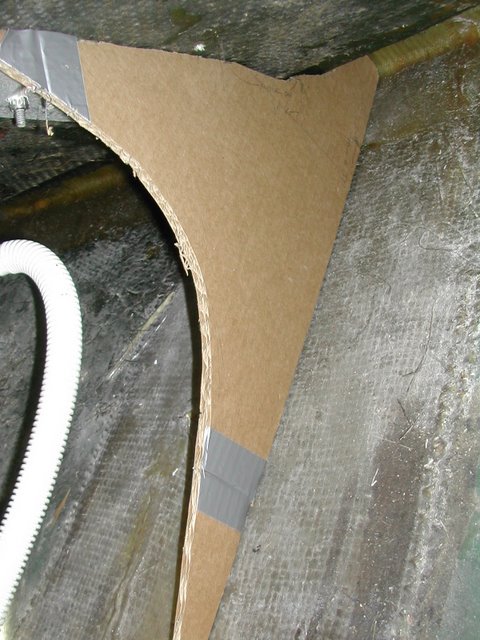
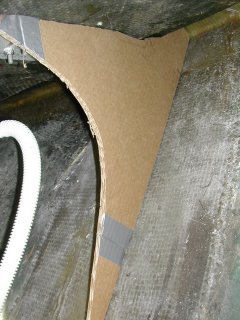
Blogger doesn't want to let me post more than four pix per post, so here are more. A couple of pictures show the backstay chainplate knee template as it approached its final form.

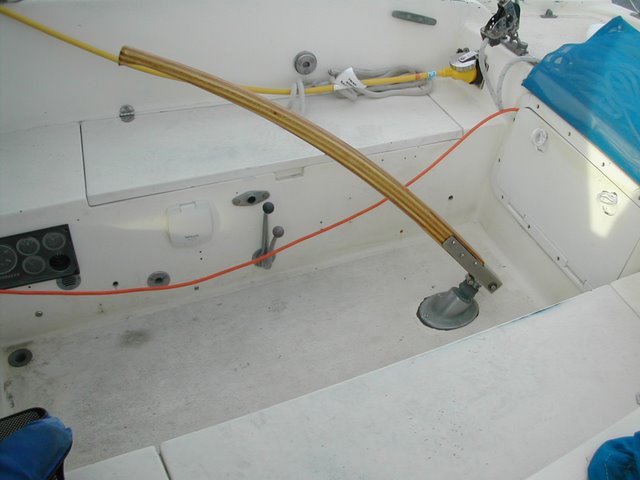
I also installed the new tiller, custom-made for Nevermind by H&M Marine Woodwork in Compton.


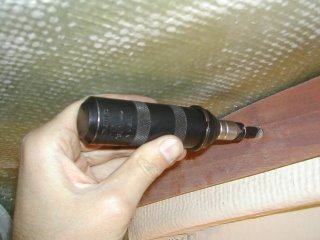
Karl was on Passat today working with Lee to troubleshoot a rough-running diesel, and after they got it running smoothly again we all went on a short harbor cruise. Then it was back to work for me. One small chore on my list was removing the wooden trim from the aft sid eof the main beam. This is where the hand impact driver earned its keep once again. This little tool is absolutely indispensible on a boat, where frozen fasteners are the norm. It's never failed to free up a stuck bolt for me.
In the evening I managed to get a valve adjustment done on the Westerbeke. Spec was .010" and all valves were loose; on the #2 cylinder, both intake and exhaust were .016"!
I adjusted to the correct clearances all aropund, but didn't firethe 'Beke up. Maybe tomorrow.

Other random things? I cleaned up the boat, and measured for the new main bulkhead reinforcement beams. I also templated the upper shroud chainplates which I will design this week. Posted by Picasa